
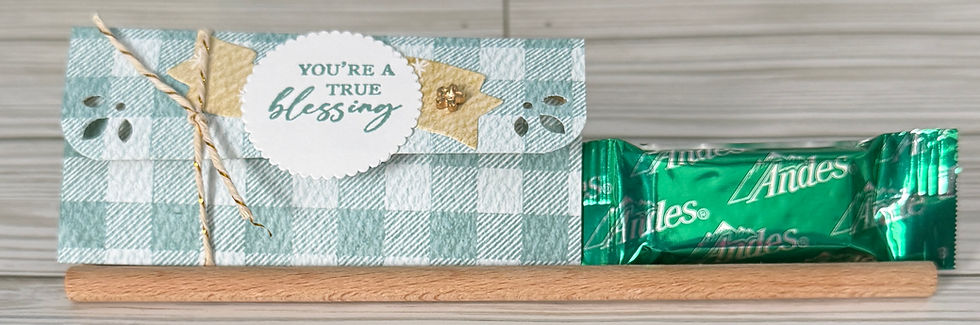
Andes Thins Treat Pouch
- Cutting Up with Kathy

- Jul 14, 2025
- 2 min read
All images © Stampin’ Up! ®
Pouch Finished Size: 4-1/4” x 2”
Supplies:
Designer Series Paper: Everyday Happiness
Stamps: Unbounded Love
Ink: Lost Lagoon
Punches: Detailed Trio; 1-1/4” Circle
Dies: Cross of Hope; Layering Circles
Adhesive: Liquid Glue; Tear & Tape
Tools: Paper Trimmer; Stampin’ Cut & Emboss
Embellishments: Simply Elegant Gold Trim; Gold Flowers
Directions:
Pouch:
1. Cut DSP 4-1/4” x 4-3/4”
2. Score on 4-3/4” side at 1-1/4” & 3-1/4”
3. Fold on Score lines & burnish with Bone Folder
4. Round all corners with Detailed Trio Punch
5. Punch both top corners (1-1/4” side) with Leaves Trio from Detailed Trio Punch
Bottom:
1. Find the center of the bottom by placing the DSP face up with the bottom
piece at the top;
Fold over the top side edges of the DSP & Pinch in the top center to make a crease
(Note: the 1-1/2” side is the bottom & the 1-1/4” side is the top)
2. Open the DSP face up, placing the bottom at the bottom;
Line up only 1/4” of the Circle Punch in the center bottom crease & Punch
3. Adhere the bottom sides only with Tear & Tape
Sentiment:
1. Die Cut coordinating DSP with Banner from Cross of Hope Dies
2. Die Cut Basic White with 1-1/2” Scallop Circle Die
3. Stamp “You’re a True Blessing” in Lost Lagoon Ink
Finishing Up:
1. Adhere the Banner to the top front of the Pouch at an angle with Liquid Glue;
Adhere the Sentiment in the center with Liquid Glue
2. Add Gold Flower to Banner
3. Insert one Andes Thin inside pouch
4. Wrap Gold Twine around the Pouch, tie in a knot & trim


Comments